LEGO parts are made to be stacked, one on top of another. This lesson starts there, shows what stacking cannot do, and introduces the idea the rest of the course is about: pointing a stud somewhere other than up.
How parts hold together
Studs on top, tubes underneath
The round bumps on top of a part are studs. Underneath, most bricks and plates are hollow, with walls and tubes spaced so that they grip the studs of the part below.
Press one part onto another and they hold. Most models use no other connection, and in a stacked model it always runs the same way: studs point up, and the next part is pressed on from above.

What stacking gives you
A model made of steps
In a stacked model every stud points at the ceiling. The model grows one layer at a time, and the thinnest layer there is, is a plate.
So everything moves in steps: one plate at a time upward, one stud at a time sideways. Nothing can sit in between.

What stacking cannot do
Four things out of reach
When every stud points up, four things cannot be built: a wall with no studs showing, detail that faces forward such as a headlight or a window frame, lettering made of tiles, and any step smaller than a plate.

The same slope, unbroken
To line the three slopes up, each one has to sit a plate and a half above the one before. No stack of plates is a plate and a half tall.
This build manages it by laying one part on its back. Lesson 3 explains how. For now, notice only that it needed a part pointing a different way.

The idea: a stud that does not point up
A brick with a stud on its side
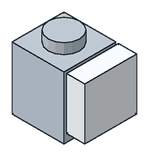
Some parts carry a stud on a side face as well as on top. Press a tile onto that stud and the tile stands upright against the brick, facing forward instead of up.
From that one stud you can build outward, and everything you attach to it is turned a quarter turn.
The name: SNOT
Builders call this SNOT, for Studs Not On Top. The name covers building sideways, upside down, and at any angle in between. Those are separate techniques with one idea in common, and the course takes them in turn: sideways in lessons 4 to 6, small offsets in lesson 7, upside down in lesson 8, angles and hinges in lesson 9.
It is how smooth walls, thin stripes, round shapes and most of the fine detail in good models are made.

In a real set
Boutique Hotel, set 10297, 2022
Over one of the windows of the first storey you build, two dark green bricks with a side stud (87087) stand side by side. A gold quarter-round tile (25269) is pressed onto each side stud, and the two tiles make a half-round ornament that faces outward, with no stud showing.
Checked against the LDraw file of the set, a part-by-part copy of LEGO’s building instructions.

The catch
A turned part does not fit
A part turned on its side keeps its size, but it now fills its space in a different direction, and the two directions of the LEGO grid are not measured in the same step. The turned part ends up a little too long or a little too short for the space around it.
The rest of the course measures that mismatch and shows how to cancel it. Lesson 1 starts with the grid itself.
